TZed keeps the cities you work with in your menu bar. One click shows what time it is everywhere, lets you slide through time to plan across zones, shows your calendar beside your cities, finds a meeting time that's fair to everyone, and puts a full-screen reminder in front of you a minute before a call.
This guide covers the Mac app, version 0.4 and later. TZed also has an iPhone app with widgets; your cities sync between the two through iCloud.
Contents
- Getting started
- The menu bar item
- The popover
- Your cities
- Home, Current Location and the active zone
- Time travel
- Your calendar
- Joining meetings
- Scheduling a meeting
- Full-screen meeting reminders
- Settings
- Widgets
- iCloud sync with the iPhone app
- Updates
- Permissions
- Keyboard and mouse shortcuts
- Troubleshooting
Getting started
What you need
- A Mac running macOS 14 Sonoma or later.
- For calendar features: your calendars set up in Apple's Calendar app (iCloud, Google, Microsoft 365/Exchange and so on). TZed reads them through macOS; it never asks for your account passwords.
- For sync with the iPhone app: the same iCloud account on both devices.
Install
- Open the TZed disk image (
TZed-x.y.z.dmg). - Drag TZed onto the Applications folder.
- Open TZed from Applications.
If you open TZed straight from the disk image instead, it asks Move TZed to Applications? Choose Move to Applications: TZed copies itself there and relaunches. It needs to live in Applications to keep itself up to date. If a copy is already there, this replaces it.
First launch
TZed has no Dock icon and no window. Look in the menu bar for a small rounded badge with today's date number in it, followed by the date: that's TZed.
The first time it runs, TZed starts with one city: your Mac's own time zone, marked as Home. If you already use TZed on another Mac or on your iPhone with the same iCloud account, your cities arrive from iCloud instead.
Next steps:
- Click the badge to open the popover.
- Click Add city to add the places you care about.
- Click Show My Calendar in the right-hand column if you want your events beside your cities.
- Open Settings (the gear at the bottom right, or ⌘,) and turn on Launch at login so TZed is always there.
The menu bar item

What the menu bar shows
Choose in Settings → General → Menu bar → Show. Whichever you pick takes on your menu bar's color, so it works in light and dark mode.
- Date (the default): a badge with the day of the month, then the full date, for example Tue, Nov 3. Both follow your Home city's calendar, not necessarily your Mac's: if Home is Tokyo, the badge turns over at midnight Tokyo time. With no Home city they follow your Mac's time zone.
- Time in a city: one city's name and current time, for example New York 3:21 PM. Pick the city in the City menu that appears below. Until you pick one, TZed shows your first city that isn't Home. Useful when your Mac's own clock already shows your time and date.
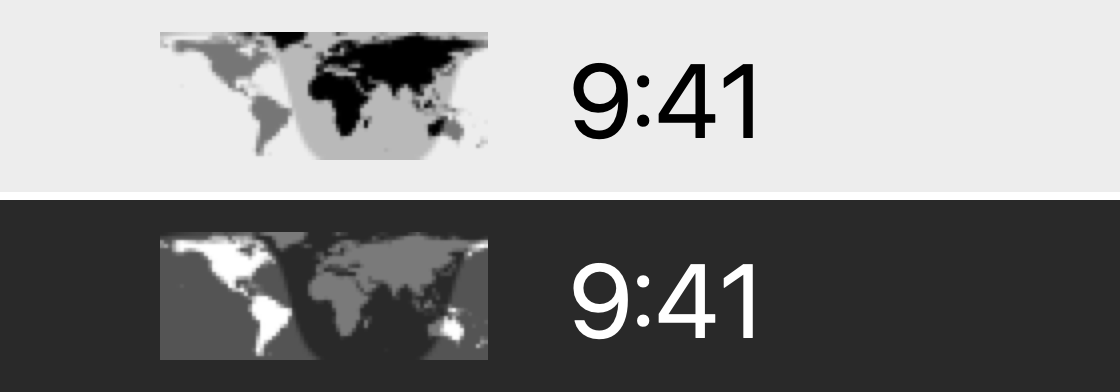
- Day and night map: a small world map with the sunlit half and the night half, like the time zone map in macOS's Date & Time settings. It moves with the sun and updates every minute. On a light menu bar the night side is shaded; on a dark one the daylight side is bright.
- Icon only: a globe, nothing else.
Next meeting in the menu bar (optional)

Turn this on in Settings → Calendars → Show next meeting in the menu bar. It's off by default so TZed doesn't take up extra menu bar space.
When it's on, TZed adds the next meeting's title and a countdown, such as 11/3 · Standup · 12m:
- It appears only when a meeting starts within the next hour, so a 4 PM meeting doesn't sit in your menu bar all morning.
- Once the meeting starts it reads now, and it stays for 10 minutes after the start in case you're joining late.
- While it shows, the date shortens to numbers (11/3) to make room, and long titles are cut to 20 characters. With the other menu bar styles the meeting is added after the city time, map or icon.
- All-day events never appear here.
- By default it watches all your calendars. To limit it, see Menu-bar next meeting.
Clicking the menu bar item
- Click: opens or closes the popover.
- Option-click (⌥-click): joins the meeting shown in the menu bar, if it has a video link (Zoom, Teams, Google Meet and so on). Hover over the item to see a reminder: "⌥-click to join Standup".
- Right-click (or Control-click): opens a short menu:
- Install Update x.y.z and Relaunch, when an update is waiting.
- Join meeting name, when the menu bar is showing a meeting that has a video link.
- Settings… (⌘,)
- Quit TZed (⌘Q)
The popover
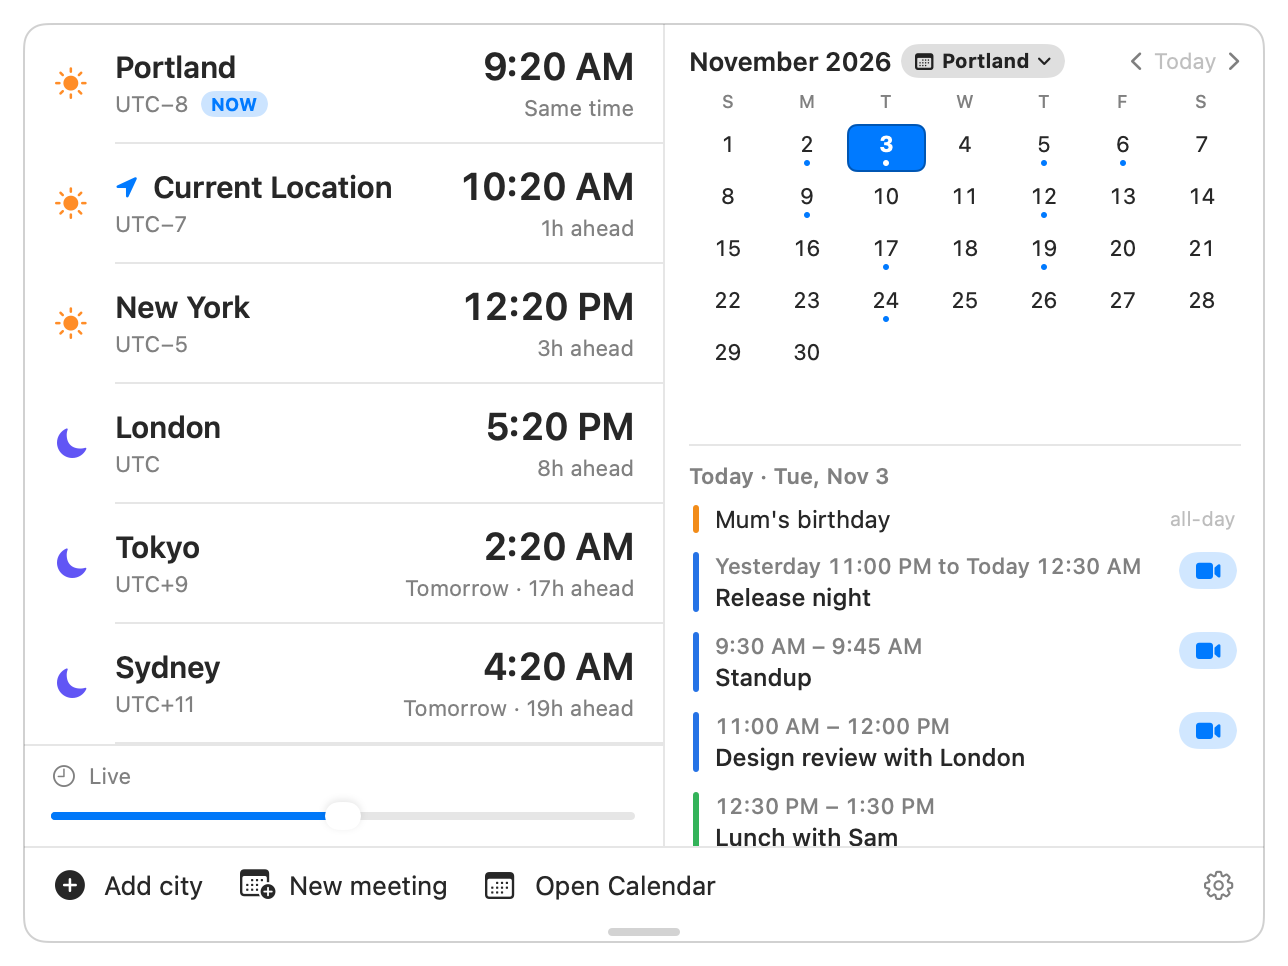
The popover has three parts:
- Left: your cities, one row each, with the time-travel slider under them.
- Right: your calendar, a month grid with the selected day's events below.
- Bottom bar: Add city, New meeting, Open Calendar, and the gear for Settings. When an update is waiting, an Update x.y.z link appears here too.
Opening and closing
The popover stays open until you close it on purpose, so you can click into another app to check something and come back to it. It closes when you:
- click the TZed menu bar item again,
- press Esc while the popover is the active window,
- open Settings, or
- switch to another desktop (Space) or into or out of a full-screen app.
Each time it opens, TZed refreshes the time and re-reads your calendar.
Resizing the popover

The thin bar along the very bottom edge of the popover is a grip:
- Drag it up or down to make the popover shorter or taller.
- Double-click it to go back to fitting every city exactly.
By default the popover is just tall enough to show all your cities. If you have more cities than fit, the city list scrolls, and a taller popover gives the event list more room. The popover never gets shorter than the month grid plus a few events, and never taller than your screen. If you drag the edge back to within a few points of the fit-all height, it snaps to fit-all again and keeps fitting as you add or remove cities. TZed remembers the height on each Mac separately.
Your cities
Reading a city row
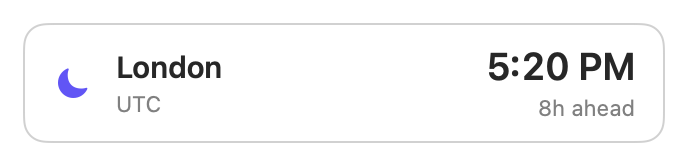
Each row shows, from left to right:
- Sun or moon: a sun when it's daytime there, a moon at night. TZed works this out from the city's real sunrise and sunset, so a summer evening in Stockholm still shows a sun.
- City name. A location arrow before it marks Current Location.
- UTC offset under the name, such as UTC−7, UTC+5:30, or UTC, followed by the row's badges:
- NOW marks the city everything else is measured from (the anchor, explained below) while you're looking at the present time. It disappears while you're time-traveling.
- ACTIVE (a solid colored badge) appears when you've clicked a city to make it the anchor. That row also gets a colored bar along its left edge.
- The time in large type, in 12-hour or 24-hour format.
- How far ahead or behind the anchor city it is, such as 3h ahead, 1h 30m behind, or Same time. When it's a different date there, the day comes first: Tomorrow · 16h ahead, Yesterday · 8h behind, or +2 for further away. The anchor city's own row shows its date instead, such as Thu, Nov 26, so you can always see which day you're looking at, even while time-traveling.
What clicking a row does
- Click the row (the name side) to make that city the active zone. See The active zone.
- Click the time (the right side) to set an exact time for that city. See Set an exact time.
- Right-click the row for its menu:
- Set Time…
- Rename…
- Set as Home (not shown on the Home city)
- Move Up / Move Down (only with Manual order)
- Remove
The Current Location row only offers Set Time…, because it isn't one of your saved cities.
Add a city
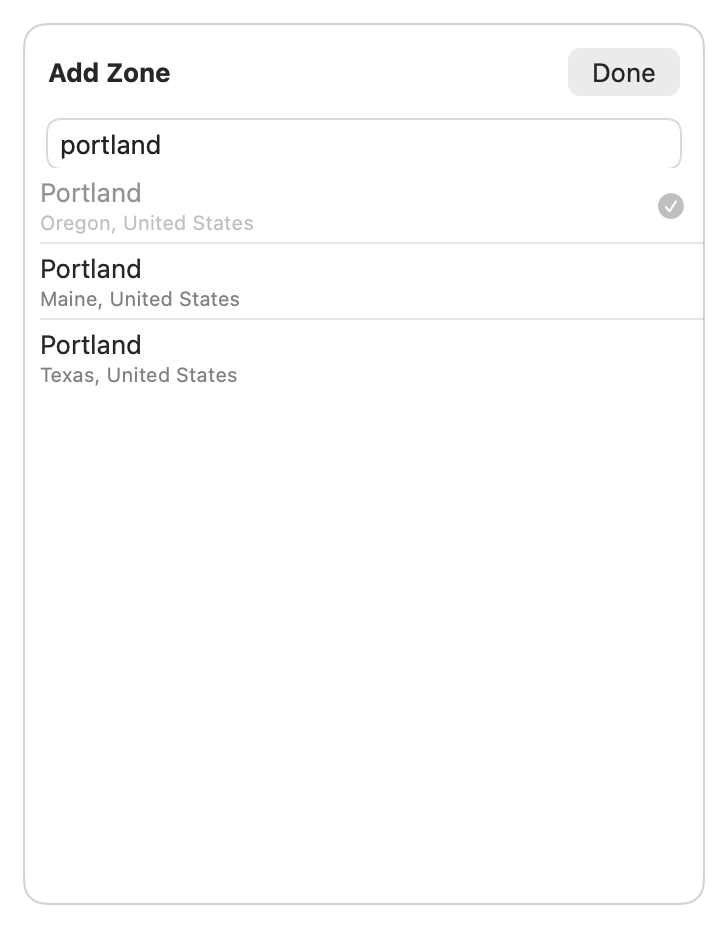
- Click Add city at the bottom left of the popover.
- Type a city name. You can add a state or country to narrow it down: boston, portland or, paris france, or portland, me all work. Capitals and accents don't matter, and bigger cities are listed first.
- Click the city you want. TZed adds it and closes the sheet.
Cities you've already added show a check mark and can't be added twice. Click Done to close the sheet without adding anything.
TZed knows about 34,000 cities and picks the right time zone for each, so you never have to know whether a city is on Central or Eastern time.
Add GMT (UTC)
When the search box is empty, or you type gmt, utc, or greenwich, the first entry is GMT — Greenwich Mean Time. It's UTC: offset zero, and it never changes for daylight saving time. Its sun and moon follow Greenwich, London.
Rename a city
The name is only a label; renaming never changes the time zone. Call it "Mum", "Office", or "Sarah (Berlin)".
- Right-click the city and choose Rename….
- Type the new name and click Save (or press Return).
You can also rename cities in Settings → Time Zones by clicking a name and typing.
Set your Home city
Right-click a city and choose Set as Home, or click the house icon beside it in Settings → Time Zones, or pick it from the Home menu there. There is always exactly one Home city. It decides the menu bar date and, unless you change Main view, which city everything is measured from.
Remove a city
Right-click it and choose Remove, or click its trash can in Settings → Time Zones.
Put cities in order
Settings → General → Order has two choices:
- By time zone offset (the default): west to east, so the list reads like a map. Cities in the same zone keep the order you added them.
- Manual: you arrange them. Right-click a city and choose Move Up or Move Down, or use the up and down arrows in Settings → Time Zones.
Home, Current Location and the active zone
Every offset in TZed ("3h ahead", "Tomorrow") is measured from one city, the anchor. The anchor is also the city whose calendar day the month grid and event list show, and the one the time-travel slider reads out.
Current Location
When your Mac's time zone isn't the same as your Home city's (say you're travelling, or your Home is somewhere you don't live), TZed adds a Current Location row marked with a location arrow. It follows the time zone set in System Settings → General → Date & Time, so it changes automatically when you land somewhere new and your Mac updates its zone. TZed doesn't use Location Services for this.
When your Mac is in the same time zone as Home, the Current Location row is hidden, because it would just repeat Home.
Main view: Home or Current Location
Settings → Time Zones → Main view picks the everyday anchor:
- Home (the default): offsets are measured from your Home city.
- Current Location: offsets are measured from wherever your Mac is.
If you're travelling and want "3h ahead" to mean "ahead of where I am right now", choose Current Location. The menu bar date always follows Home either way.
The active zone
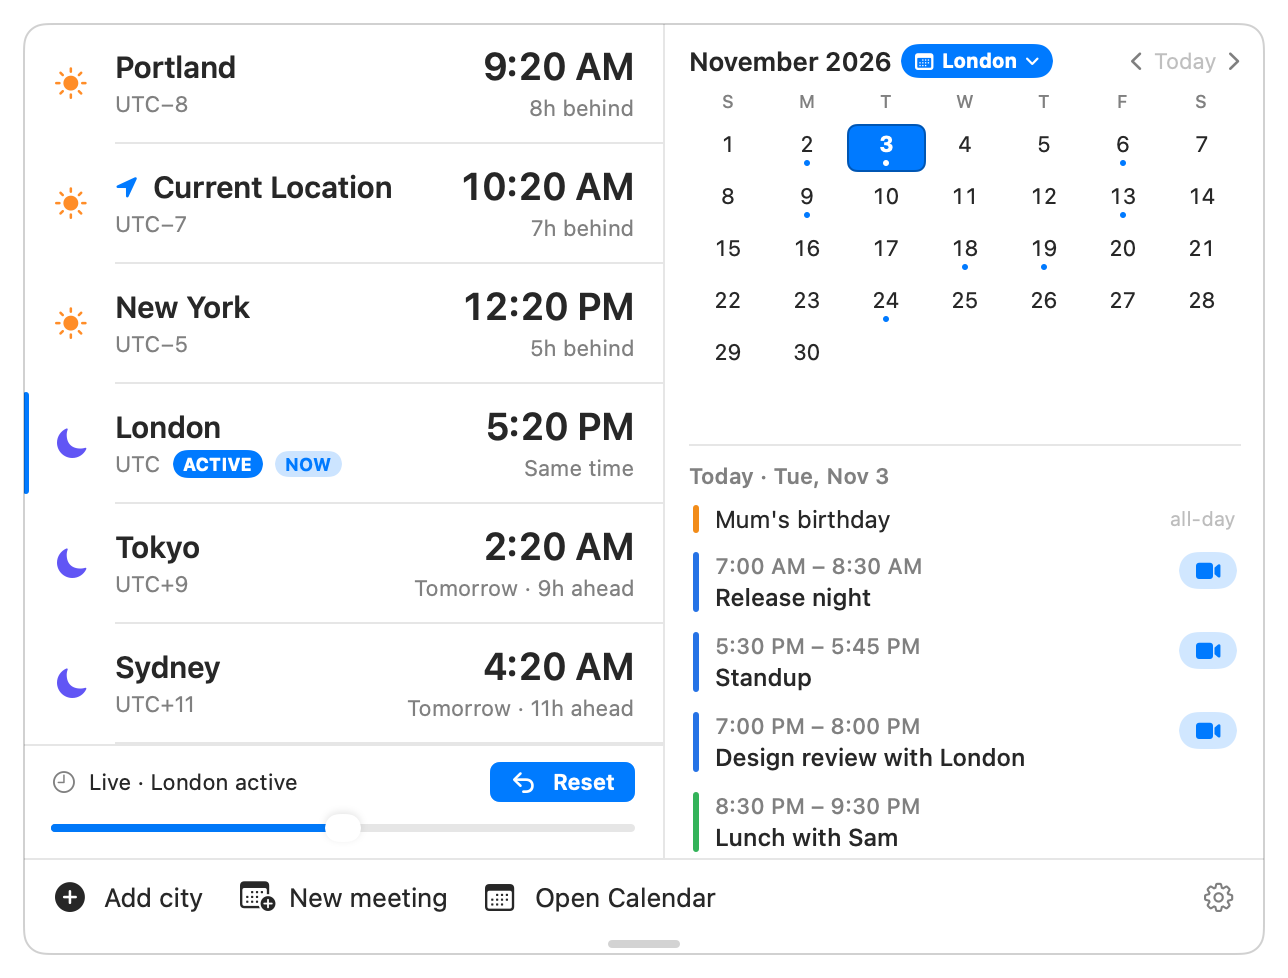
Sometimes you want to see things from another city's point of view for a moment: "what's everyone's time relative to London?" Click London's row. It becomes the active zone:
- It wears a solid ACTIVE badge (and NOW, if you're looking at the present) beside its UTC offset, and a colored bar along its left edge.
- Every other row's offset is now measured from London.
- The month grid and event list switch to London's days, and event times are shown in London time.
- The calendar chip beside the month name turns solid blue and reads London.
- The slider's readout names London.
- New meeting lays out London's day.
To go back, click London's row again, click Reset under the city list, or choose your Home or Main city from the calendar chip. The active zone also resets when the popover closes, unless you've turned off Reset to now when the popover closes.
You can also pick the active zone from the calendar chip next to the month name: it lists every city, with — Home and — Main beside those two so you can jump back in one click.
Time travel
Time travel shows every city at some other moment: "when it's 9 AM in Tokyo on Tuesday, what time is it for everyone else?" There are four ways in, and every city follows instantly.
The slider
The slider under the city list moves time up to 24 hours forward or back:
- It moves in 15-minute steps. On a Force Touch trackpad you feel a click at each step.
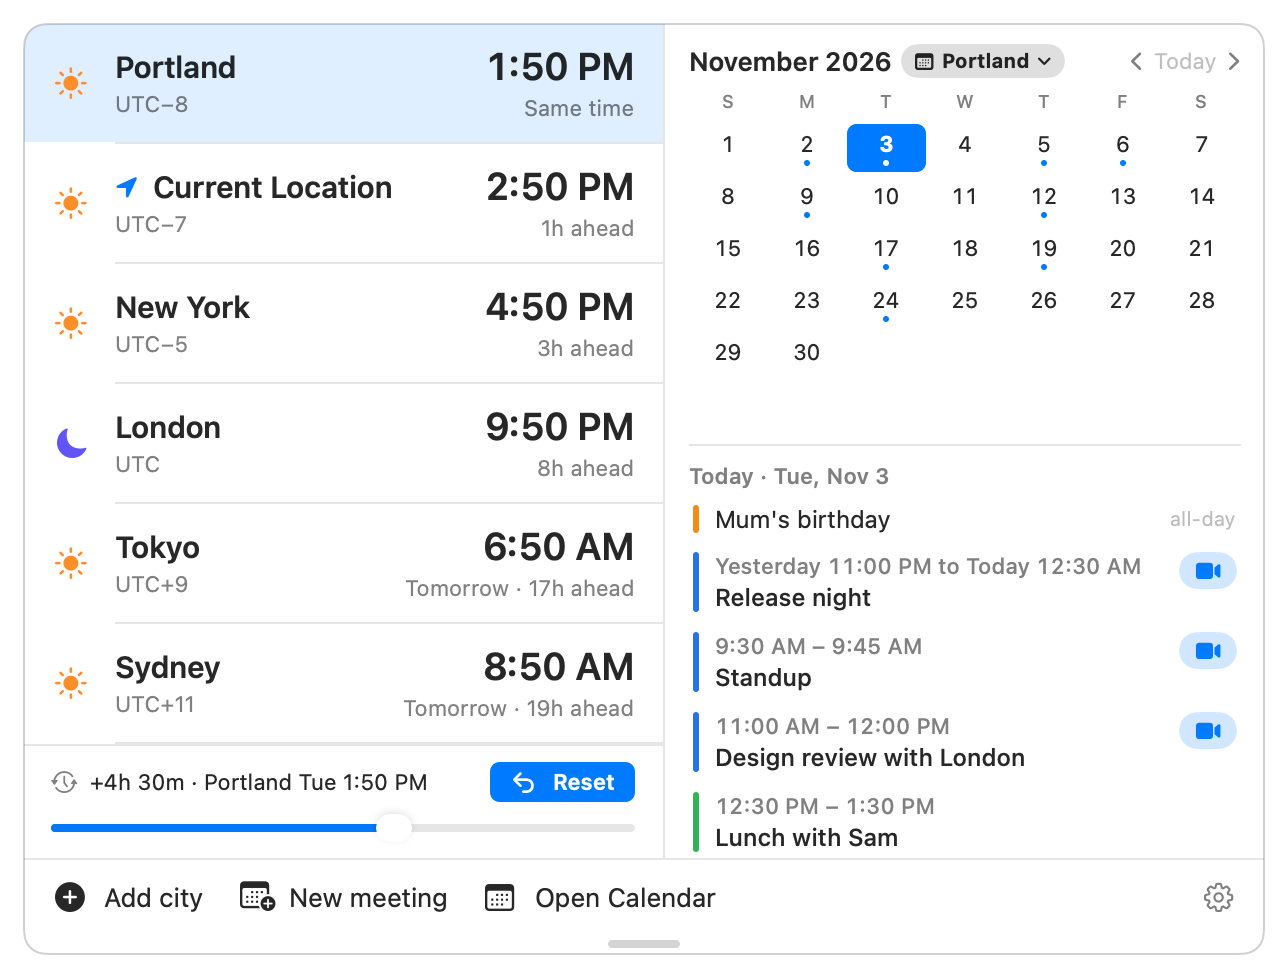
- The readout above it shows how far you've gone and what time that is in the anchor city, for example +4h 30m · Portland Tue 1:50 PM. For trips of a day or more it counts days too: +6d 1h.
- Dragging back to the middle returns to the live time.
Set an exact time
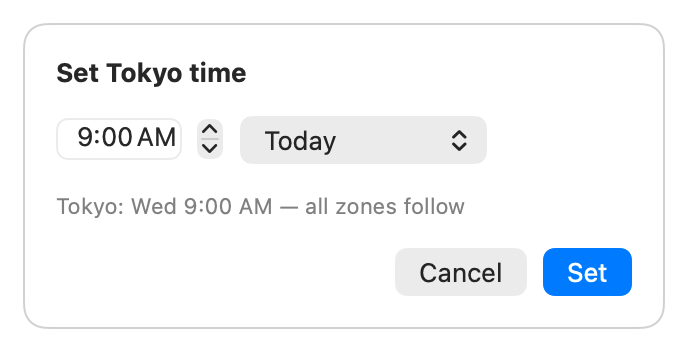
- Click a city's time (or right-click the row and choose Set Time…).
- Click the hour or the minute, then use the arrows beside the field or the ↑ and ↓ keys to change it. You can also type.
- Choose the day from the menu beside it: Today, Tomorrow, Yesterday, or a date up to a week either way. "Today" means today in that city.
- Check the line underneath, for example Tokyo: Tue 9:00 AM — all zones follow, then click Set (or press Return).
Every city now shows that moment. The slider then adjusts time around the moment you set rather than around the present.
Click a day in the calendar
Clicking a day in the month grid moves every city to that day at the current time of day. If you'd already moved the time with the slider, the new day keeps that time. Clicking today again (when you haven't moved the time) takes you back to live.
Click an event
Clicking an event in the event list moves every city to the moment it starts: the quickest way to answer "what time is the 10:30 for my colleague in Sydney?" The slider then adjusts time around the event.
Knowing you're time-traveling
- The NOW badge disappears.
- The slider readout shows the offset and time instead of Live, and its clock icon changes.
- The city the time was set from gets a light colored background.
- The day being shown wears a colored ring in the month grid.
- A Reset button appears beside the readout.
Getting back to now
Click Reset. It returns everything at once: the live time, your normal anchor city, and today in the calendar. Reset also appears when only the active zone has changed; the readout then says, for example, Live · London active.
By default, closing the popover also resets everything, so it always opens on the present. You can change that in Settings → General.
Your calendar
The right-hand column shows your Apple Calendar events beside your cities. The first time, it shows a Show My Calendar button; click it and allow access when macOS asks. See Permissions.
The month grid
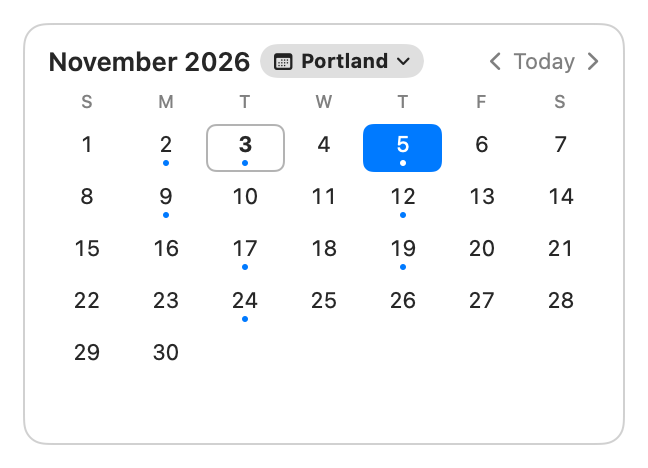
- Today has an outline; the selected day is filled with color.
- A small dot under a date means it has events.
- A colored ring marks the day you've time-traveled to.
- ‹ and › change the month. Today jumps back to this month and today.
- Days are counted in the anchor city's time, so the grid always agrees with the anchor row's date. The week starts on the day set in your Mac's Language & Region settings.
The calendar chip
The chip beside the month name always names the anchor city. It's grey for your normal anchor and turns solid blue when an active zone has taken over. Click it to choose a different active zone. See The active zone.
The event list
Under the grid, the selected day's events:
- The heading reads Today · Tue, Nov 3, or just the date for other days.
- All-day events come first, marked "all-day".
- Timed events show their start and end in the anchor city's time, their title, and a colored bar in their calendar's color.
- An event that started the day before and runs past midnight is listed at the top with a day on both ends, so you can see part of it falls on the day you're viewing: Yesterday 11:00 PM to Today 12:30 AM. Days further away show as a weekday (Thu 11:00 PM to Fri 2:00 AM) or, more than a week away, a date (Oct 24).
- The event happening at the moment you're looking at (now, or the time you've traveled to) is highlighted.
- Events with a video link have a camera button that joins the call. See Joining meetings.
- Click an event to move every city to its start time.
Choosing which calendars appear
Settings → Calendars → Calendars lists every calendar on this Mac with its color and account. Untick any you don't want in the popover. This choice is kept on each Mac separately and doesn't sync.
Open Calendar
Open Calendar in the bottom bar opens Apple's Calendar app on the day the popover is showing.
How fresh the calendar is
TZed re-reads your calendars when you open the popover, whenever macOS reports a calendar change, every 30 minutes, and when your Mac wakes. A meeting just created in Outlook or Teams appears once it has synced to your Mac's Calendar accounts.
Joining meetings
TZed recognizes video links in an event's location, notes and URL for:
- Zoom
- Microsoft Teams
- Google Meet
- Webex
- FaceTime
- other web meeting links
Zoom and Teams links open straight in the Zoom or Teams app when it's installed, skipping the browser hand-off page. Everything else, and Zoom or Teams without their app, opens in your web browser.
You can join from:
- the camera button on an event in the popover,
- ⌥-click on the menu bar item, or right-click → Join, while the menu bar shows that meeting,
- Join on the full-screen reminder.
Scheduling a meeting
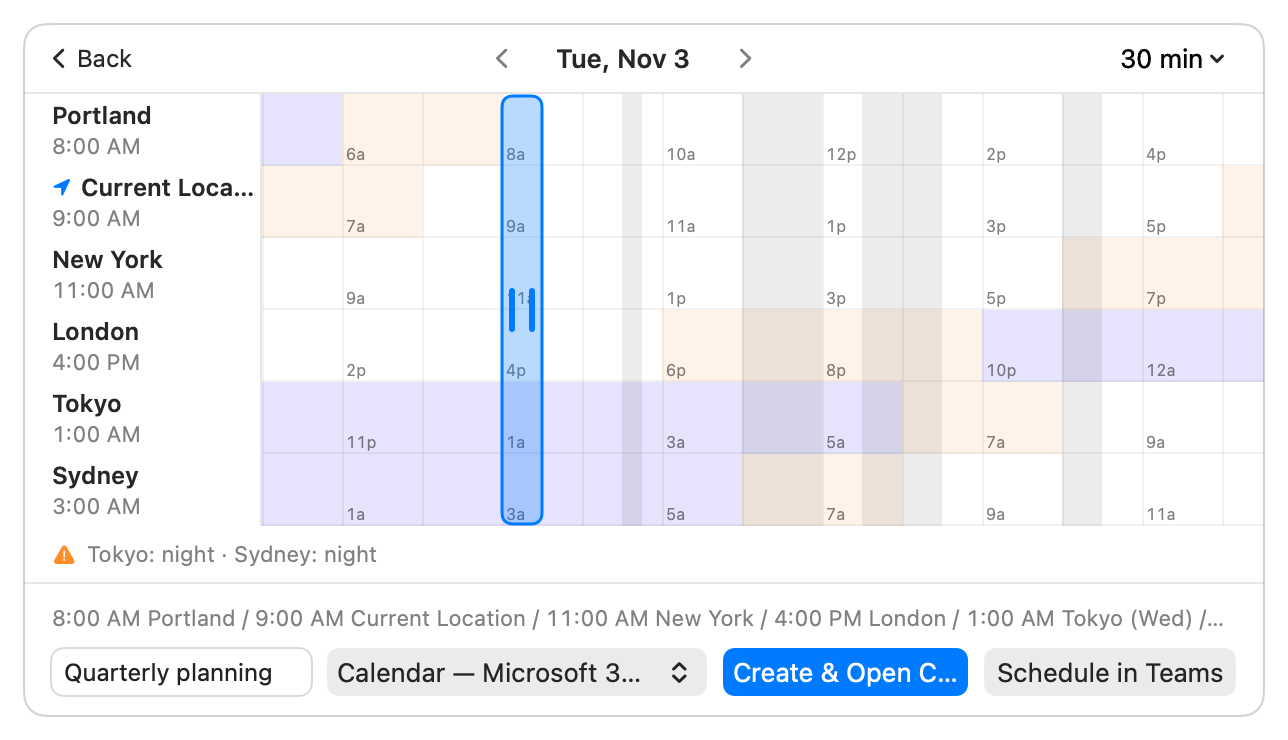
New meeting lays out a whole day for every city side by side, so you can find a time that's reasonable for everyone and put it in your calendar. It appears in the bottom bar once TZed has calendar access.
The day strip
- Each city gets a row showing 24 hours of the anchor city's day, labelled every two hours in that city's local time. Read straight down any column to see one moment everywhere.
- The left column shows each city's name and its local time at the start of the meeting.
- Row colors show how civilized the hour is in each city:
- No tint: working hours, 8 AM to 6 PM.
- Orange tint: early (6–8 AM) or evening (6–10 PM).
- Indigo tint: night (10 PM–6 AM).
- Grey shading across all rows marks times you're already busy, from the calendars ticked in Settings. All-day events don't count.
- Scroll sideways to see the rest of the day.
Choosing the time
- The colored band is the meeting. Drag it left or right to move it.
- Drag either edge of the band to make it longer or shorter.
- Times snap to 15 minutes, with a click on a Force Touch trackpad. A meeting can't be shorter than 15 minutes.
- The menu at the top right sets the length: 15 min, 30 min, 45 min, 1 hr, 90 min or 2 hrs. New meetings start at 30 minutes.
- ‹ and › beside the date move to the previous or next day, keeping the time.
- Under the strip, TZed says Works for everyone, or warns you, for example London: evening · Tokyo: night.
The panel opens at the time the popover was showing. From the live popover that's now, rounded to the nearest quarter hour. If you'd time-traveled or clicked an event, it's exactly that moment, so you can set a time first and then schedule it.
Creating the event
At the bottom:
- A summary line such as 10:00 AM Portland / 1:00 PM New York / 6:00 PM London. Cities on a different date get the weekday, such as 2:00 AM Tokyo (Sat). This line is added to the event's notes, so everyone can see the times in their own city.
- Meeting title: required.
- Calendar: which calendar to put the event in. Each entry shows its account ("Calendar — iCloud") because most accounts have a calendar called "Calendar". TZed remembers your last choice on this Mac.
Then choose one of:
- Create & Open Calendar (or press Return): saves the event to that calendar, then opens it in the Calendar app so you can add invitees. macOS doesn't let other apps add invitees, so that last step happens in Calendar.
- Schedule in Teams: shown only when the chosen calendar is a Microsoft 365 (Exchange) account. It opens Microsoft Teams' own new-meeting form with the title, time and summary already filled in. Add attendees there and click Send. Teams creates the event with its Teams link, and it syncs back to your calendar; TZed doesn't create a second copy. Teams opens in its app if installed, otherwise on the web.
Note: Schedule in Teams uses Teams' default calendar. Teams always creates the meeting in the calendar of the account it's signed in to, not necessarily the one you picked in TZed. The picker only decides whether the button appears.
Click Back (top left) to leave without creating anything.
Full-screen meeting reminders
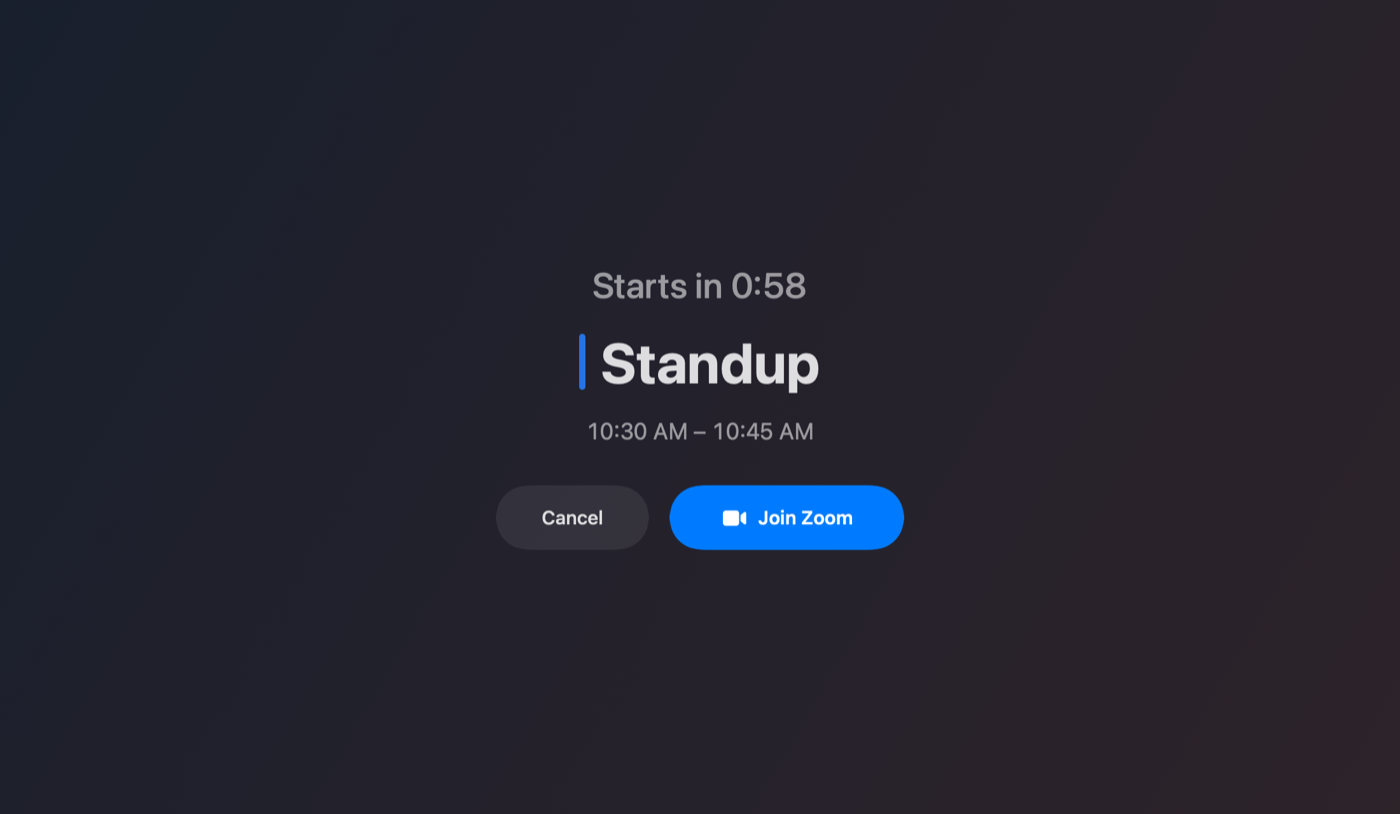
A minute before a meeting starts, TZed covers your screen with a reminder you can't miss:
- a countdown (Starts in 0:58, then Starting now, then Started 1:05 ago),
- the meeting title and its time, in your Mac's local time,
- Join (Return), which opens the call and closes the reminder,
- Cancel (Esc), which closes the reminder.
Details:
- It only appears for meetings with a video link, from calendars ticked in Settings. All-day events never get one.
- It appears on the screen your pointer is on, over full-screen apps and on every desktop.
- If your Mac was asleep and wakes within five minutes after a meeting started, the reminder appears right away.
- If you ignore it, it goes away by itself 10 minutes after the start.
- Once you cancel a meeting's reminder, it doesn't come back for that meeting.
Turn reminders on or off in Settings → Calendars → Full-screen reminder before meetings. They're on by default once TZed has calendar access.
Settings
Open Settings with the gear at the bottom right of the popover, ⌘, while the popover is open, or right-click the menu bar item → Settings…. Settings has three tabs. Changes take effect immediately; Done (or Esc) closes the window.
General
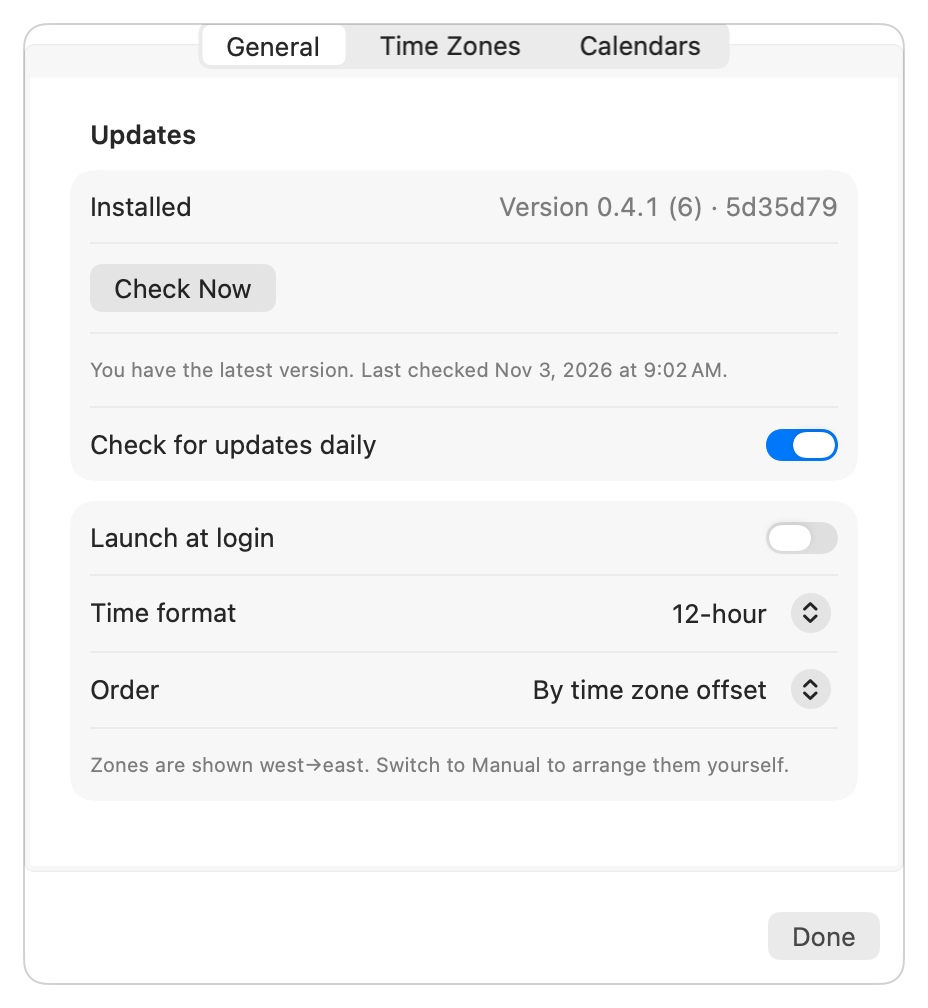
Updates
- Installed: your version, build and code revision, such as Version 0.4.1 (6) · 5d35d79. Handy when reporting a problem.
- Install and Relaunch: appears with the new version's notes when an update is waiting.
- Check Now: checks for an update right away.
- A status line: when TZed last checked, or what went wrong.
- Check for updates daily: on by default.
See Updates.
Startup, time and order
- Launch at login: starts TZed when you log in.
- Time format: 12-hour or 24-hour.
- Order: By time zone offset (west to east) or Manual.
Menu bar
- Show: Date, Time in a city, Day and night map or Icon only. See What the menu bar shows.
- City: which city Time in a city shows.
Popover
- Reset to now when the popover closes: on by default. When on, every time the popover closes, time travel, the active zone, the selected day and an unfinished New meeting are cleared, so it always reopens on the present. Turn it off to keep them across closes until you click Reset.
Time Zones
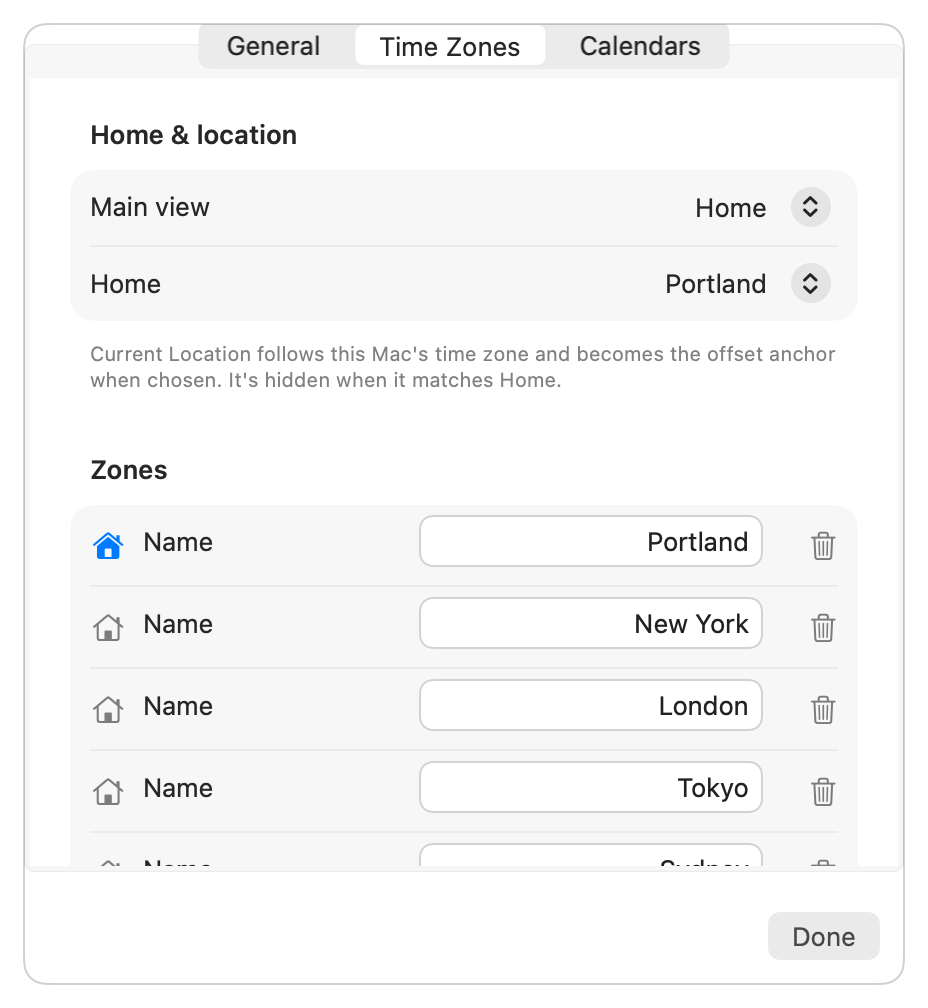
Home & location
- Main view: Home or Current Location, the everyday anchor. See Main view.
- Home: which city is Home.
Zones: every saved city, each with:
- a house icon: click to make it Home (filled for the current Home),
- its name: click and type to rename; Return or clicking elsewhere saves,
- up and down arrows to reorder (only with Manual order),
- a trash can to remove it. You can't remove the last city here.
Calendars
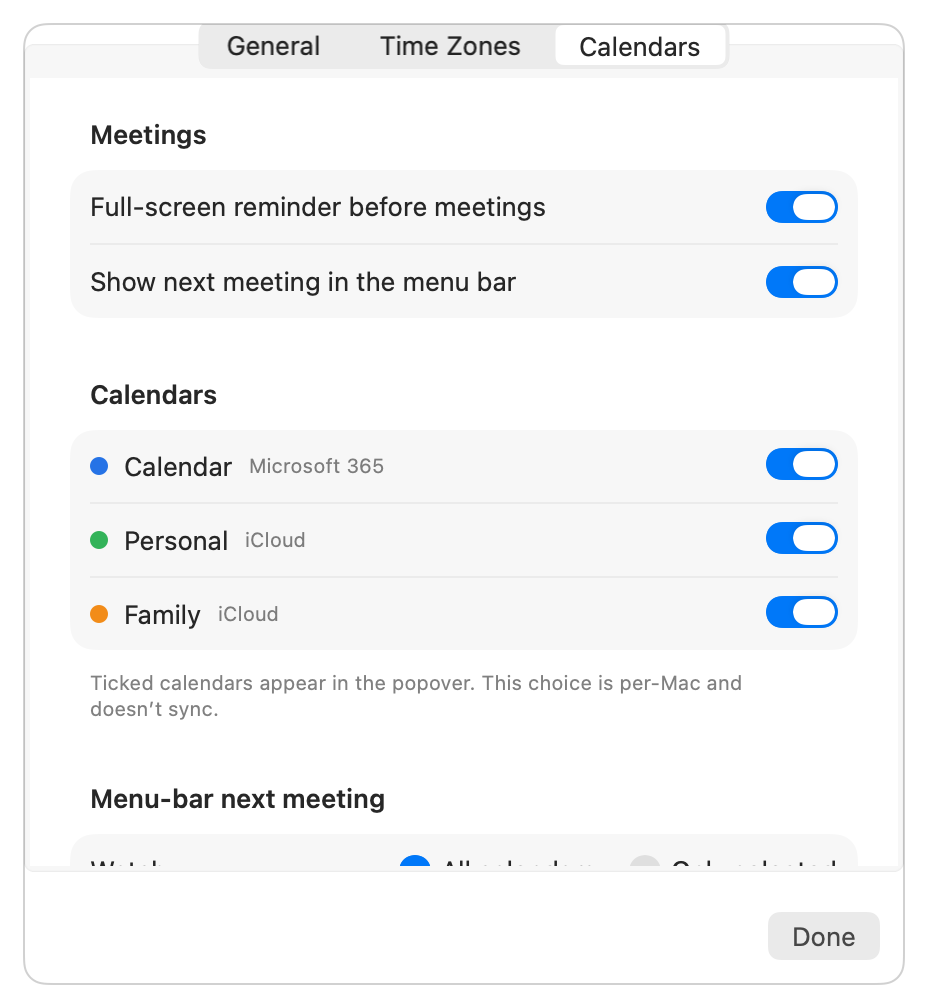
Before you've given TZed calendar access, this tab shows Show My Calendar (or, if access was turned off, a note and an Open System Settings button). With access:
Meetings
- Full-screen reminder before meetings: on by default. See Full-screen meeting reminders.
- Show next meeting in the menu bar: off by default. See Next meeting in the menu bar.
Calendars
Every calendar on this Mac, with its color and account. Ticked calendars appear in the popover, shade the New meeting strip, and can trigger reminders.
Menu-bar next meeting (shown only when that option is on)
- Watch: All calendars (the default) or Only selected. With Only selected, tick the calendars the menu bar should watch. This is separate from the popover's list, so you can, say, show your family calendar in the popover but keep it out of the menu bar.
Calendar choices are kept on each Mac separately and don't sync.
Widgets
TZed has three widgets. Zones and Zones — Large go on the desktop or in Notification Center. Zones — Extra Large goes on the desktop only (macOS doesn't offer extra-large widgets in Notification Center) and needs macOS 27.
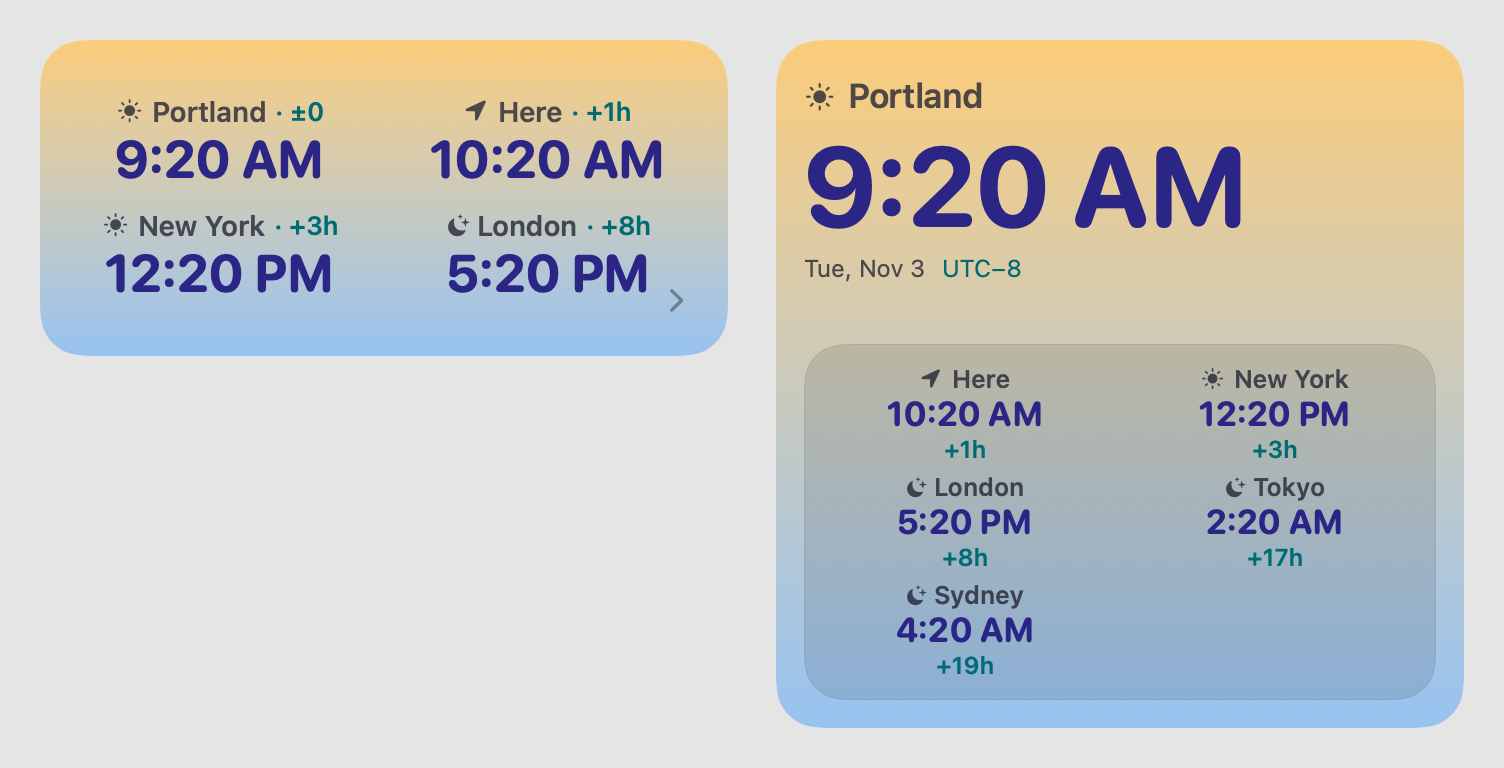
Adding a widget
- Right-click an empty part of your desktop and choose Edit Widgets…, or open Notification Center (click the date and time at the right end of the menu bar) and click Edit Widgets at the bottom.
- Search for TZed.
- Choose Zones (medium), Zones — Large or Zones — Extra Large and drag it where you want it.
What they show
- Zones (medium): up to four cities in a two-by-two grid.
- Zones — Large: your anchor city large at the top, with up to six more in a panel beneath.
- Zones — Extra Large (tall): your anchor city's time extra large at the top, then up to ten more cities, one per row, spread out to fill the widget.
- The background is the sky at the anchor city right now, following the real sun: deep indigo at night, coral at dawn, gold around midday, purple at dusk.
- The anchor city comes first, then Current Location (marked with a location arrow and labelled Here), then the rest in your chosen order.
- Each city shows its time, day or night icon, and offset from the anchor, such as +3h.
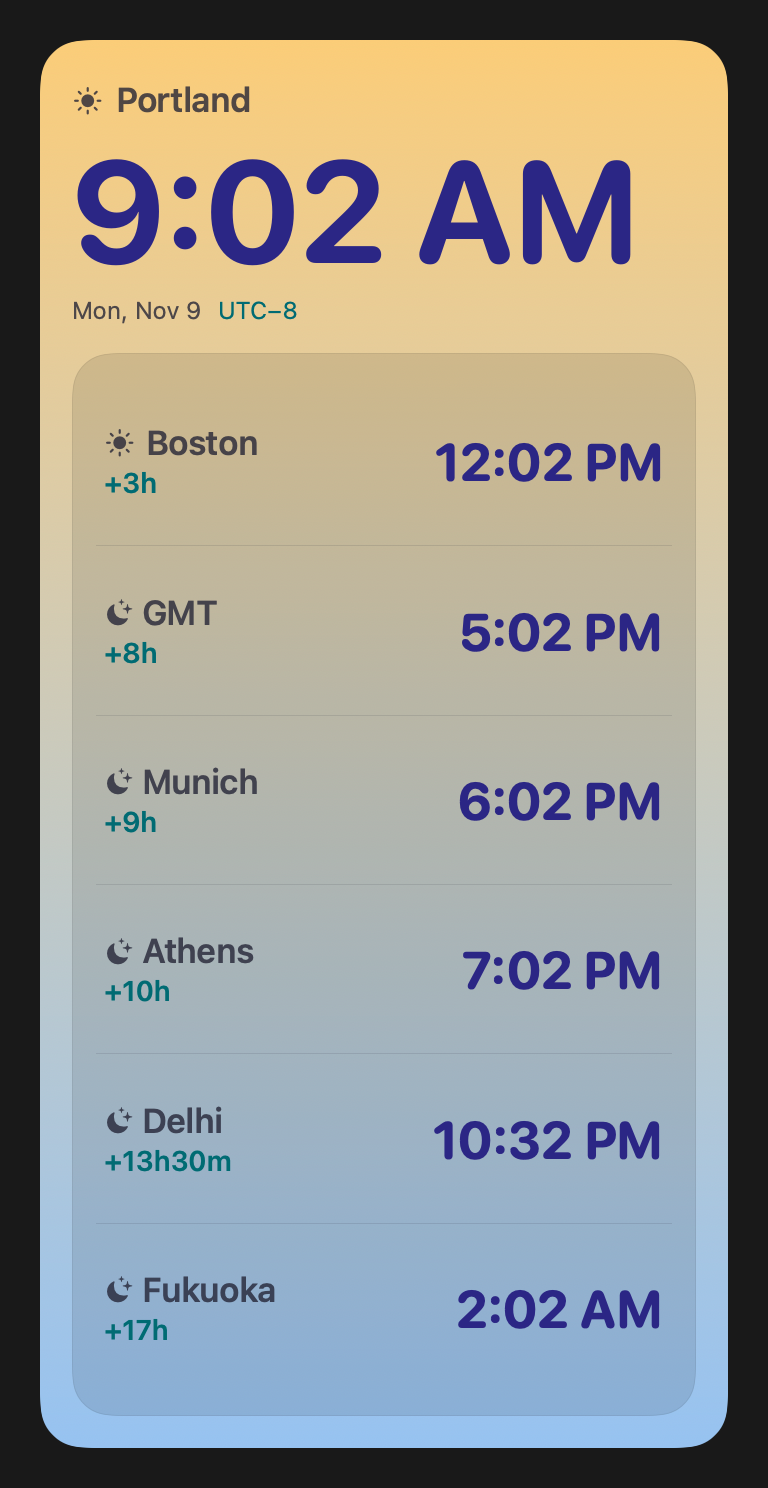
The widgets follow your Main view setting. They always show the live time; time travel and the active zone stay in the popover.
Paging through more cities
If you have more cities than fit, small arrows appear in the widget's bottom corners: › at the bottom right for the next page, ‹ at the bottom left to go back. Click them to page through every city. All widgets of the same size show the same page.
iCloud sync with the iPhone app
With the same iCloud account on your Mac and iPhone, TZed keeps these in sync across every Mac and iPhone:
- your cities, their names, and which one is Home,
- manual order,
- 12- or 24-hour time,
- the Order setting,
- Main view.
Changes arrive within moments when both devices are online. If two devices change the list at nearly the same time, the most recent change wins. A brand new install never overwrites your synced cities with its starter city.
These stay on each Mac and don't sync: calendar choices, reminders, what the menu bar shows (and its city), the menu bar meeting option, the popover's height, Reset to now when the popover closes, Launch at login, the last calendar used for New meeting, and update settings.
Updates
TZed keeps itself up to date.
- Automatically: with Check for updates daily on (the default), TZed checks once a day. If your Mac was asleep when a check was due, it checks soon after it wakes. Nothing installs without you.
- By hand: Settings → General → Check Now.
When an update is waiting, TZed tells you in three places: Settings → General (with what's new), the Update x.y.z link in the popover's bottom bar (it opens Settings), and Install Update x.y.z and Relaunch in the menu bar item's right-click menu.
To install, click Install and Relaunch. TZed downloads the update and, before replacing anything, checks that:
- the download is exactly the file that was published,
- it's signed by TZed's developer and is TZed,
- Apple has notarized it, and
- it's newer than the copy you have.
Then it replaces itself in Applications and relaunches. Your cities, settings, calendar permission and login item all carry over.
Permissions
Calendars
TZed asks for calendar access only when you click Show My Calendar (in the popover or Settings), never on its own at launch. macOS then asks whether TZed may access your calendars, with the message "TZed shows your upcoming events alongside your time zones." TZed reads events to show them and writes only the events you create with New meeting.
Without calendar access, everything about cities and time still works, along with the widgets and sync. You won't have the calendar column, New meeting, reminders or the menu bar meeting.
If you said no earlier, turn it on in System Settings → Privacy & Security → Calendars; the Open System Settings button in TZed takes you there.
Location
None. Current Location comes from your Mac's time zone setting, not Location Services.
Login item
Launch at login adds TZed to System Settings → General → Login Items & Extensions. If you block it there, the switch in TZed turns itself back off.
Keyboard and mouse shortcuts
| Shortcut | Where | What it does |
|---|---|---|
| Click | Menu bar item | Open or close the popover |
| ⌥-click | Menu bar item | Join the meeting the menu bar shows |
| Right-click or Control-click | Menu bar item | Update, Join, Settings and Quit menu |
| Esc | Popover | Close the popover |
| ⌘, | Popover or Settings | Open Settings |
| ⌘Q | Popover or Settings | Quit TZed |
| Click | City row | Make it the active zone (click again to undo) |
| Click | City's time | Set an exact time |
| Right-click | City row | Set Time, Rename, Set as Home, Move, Remove |
| Drag | Bottom-edge grip | Resize the popover |
| Double-click | Bottom-edge grip | Fit every city |
| ↑ / ↓ | Set time sheet | Change the selected hour or minute |
| Return | Sheets, New meeting, reminder | Set, Save, Create & Open Calendar, Join |
| Esc | Sheets, Settings, reminder | Cancel or close |
Troubleshooting
I can't find TZed in the menu bar
TZed has no Dock icon; it lives only in the menu bar as a date badge. If your menu bar is crowded (especially on a MacBook with a notch), it may be hidden behind other icons; quit an app or two to make room. On recent macOS versions, also check System Settings → Menu Bar and make sure TZed is allowed in the menu bar. If TZed isn't running at all, open it from Applications.
The popover doesn't close when I click somewhere else
That's on purpose, so you can check something in another app and come back. Click the menu bar item or press Esc to close it.
My time travel disappeared
By default the popover resets to the present every time it closes. To keep it, turn off Settings → General → Reset to now when the popover closes.
Something looks off and I'm not sure what's being shown
Click Reset under the city list. It returns to the present time, your normal anchor city, and today.
"3h ahead" isn't measured from where I expect
Offsets are measured from the anchor: the active zone if you clicked one (look for the ACTIVE badge), otherwise Home or Current Location depending on Settings → Time Zones → Main view.
There's no Current Location row
It only appears when your Mac's time zone differs from your Home city's. If you've changed time zones and it still doesn't show, check System Settings → General → Date & Time and make sure the time zone is set automatically.
A city's sun or moon looks wrong
Cities added from the search list use real sunrise and sunset. The starter city TZed creates on first launch (and very old entries) doesn't have coordinates, so it uses daytime as 6 AM to 6 PM. Add the city again from Add city and remove the old row.
My calendar is empty
- If the column shows Show My Calendar, click it and allow access.
- Check Settings → Calendars → Calendars and make sure the calendars you want are ticked.
- Make sure the account is set up in Apple's Calendar app and its events show there. TZed sees exactly what the Calendar app sees.
- Close and reopen the popover to refresh.
A meeting I just created in Outlook or Teams isn't there
It has to sync to your Mac's Calendar accounts first. Reopen the popover after a moment; TZed also refreshes every 30 minutes.
Join opens my browser instead of Zoom or Teams
The Zoom or Teams app isn't installed (or macOS doesn't know about it). Other services, such as Google Meet and Webex, always open in the browser.
I didn't get a full-screen reminder
Check that:
- Settings → Calendars → Full-screen reminder before meetings is on,
- the meeting has a video link (the event shows a camera button),
- its calendar is ticked in Settings → Calendars,
- it isn't an all-day event, and
- you didn't already cancel that meeting's reminder.
The next meeting doesn't show in the menu bar
It only shows from an hour before a meeting until 10 minutes after it starts. Check that Show next meeting in the menu bar is on, and, if Watch is set to Only selected, that the meeting's calendar is ticked.
New meeting is missing
It needs calendar access. Click Show My Calendar first.
Create & Open Calendar fails
TZed shows the reason in red under the controls. "That calendar is no longer available" means the calendar was removed or became read-only; pick another.
My iPhone and Mac show different cities
Both need to be signed in to the same iCloud account. Changes usually arrive within moments, but can take longer if a device has been offline. The most recent change wins.
A widget says "Open TZed" or looks out of date
Open TZed once so the widget can read your cities. If a widget still looks old right after an update, remove it and add it again.
Launch at login keeps switching itself off
It's blocked in System Settings → General → Login Items & Extensions. Allow TZed there, then turn the switch on again.
An update failed
Settings → General shows what went wrong. Click Check Now to try again. If it keeps failing, download the latest disk image and drag TZed into Applications again; your cities and settings are kept.
"Development builds don't update themselves"
You're running a copy built from source rather than a released version. Install a released copy to get updates.